
Exploring the Art of Umbrella Mandalas: A Fusion of Function and Design
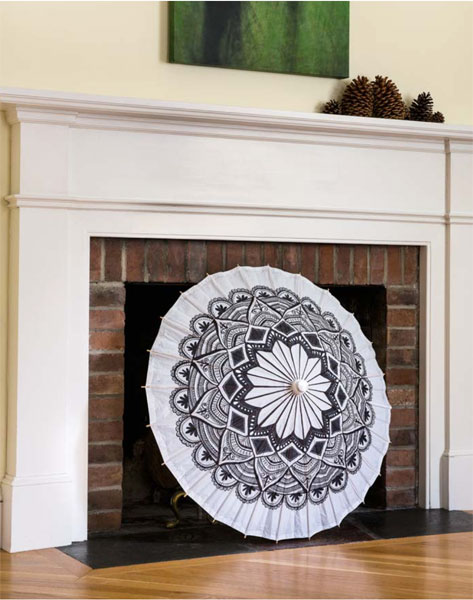
Mandalas, with their intricate, symmetrical patterns and vibrant colors, have long been symbols of balance, unity, and harmony. Traditionally circular in form, these designs can be found in a variety of cultural and spiritual contexts. But what happens when the timeless beauty of mandalas meets the practical elegance of an umbrella? The result is a stunning fusion of art and function that transforms a simple, everyday object into a canvas for creative expression. Whether it’s a decorative paper parasol providing shade on a sunny day or a statement piece in your home, the umbrella’s frame offers a perfect structure for crafting mandalas. They can be designed and colored to coordinate with a party theme or hung with a light for a unique decorative accent in your home or studio. In this article, we’ll explore 9 tips to ensure your success in creating a mandala parasol.
Explore These 9 Tips When Adding a Mandala to a Parasol
1. Vary the Distance Between the Guide Points
- Why it works: Varying the distance between the guide points on the spokes helps create a more dynamic and visually interesting design. This will allow the mandala to feel more organic and flow naturally around the parasol.
- Tip: Try drawing the spokes lightly in pencil first so you can adjust the distance between them before committing to the design.
2. Consistent Markings Around the Parasol
- Why it works: Consistency is key when creating any mandala, as the symmetry and balance are essential. It also helps maintain a uniform look across the parasol, which enhances the overall effect.
- Tip: Use a ruler or a circular template (or even a string) to help guide your placement of the spokes or markings.
3. Handle the Center Area Carefully
- Why it works: The center of the parasol is typically under tension, so it’s more fragile. The taut paper can tear or stretch if too much pressure is applied, especially when using markers.
- Tip: Use light pressure, and consider starting with a smaller design in the center to avoid overworking the area. You could also try using a fine-tip marker to start with delicate detailing and work outward.
4. Angle the Marker for Larger Areas
- Why it works: Using the side of the marker tip allows you to cover a larger area without applying too much pressure. This will create a smoother, even application of color without damaging the parasol fabric.
- Tip: Test out different marker angles on a scrap piece of paper to see which angle gives the best coverage and control.

5. Avoid Streaking with Side-to-Side Motion
- Why it works: Streaking happens when you move the marker in one direction only, and the ink doesn’t fill in smoothly. Moving the marker in rows helps prevent this and ensures an even application of color.
- Tip: Start with a light touch and gradually build up the color as needed. Overlap slightly with each stroke to create a seamless transition between areas.
6. Avoid 3-D Fabric Paint
- Why it works: 3D fabric paints is sticky and makes it hard to open the parasol with out tearing it.
- Tip: Stick with alcohol-based markers or acrylic paint pens, which dry faster and remain flat. If you want a bit of texture, consider adding fine details using glitter or metallic pens, which will give a shimmer without affecting the parasol’s function.
7. Work from the Center Outward
- Why it works: Working from the center allows you to avoid smudging, as the outer parts of the parasol won’t be affected by your hand movements. It also helps you maintain symmetry and balance as you create the mandala.
- Tip: If you’re left-handed, work from right to left to avoid smudging the colors with your hand. Alternatively, use parchment paper or a piece of clean cloth to protect your hand from getting ink on the parasol.
8. Layering Lighter Colors
- Why it works: Lighter colors are more translucent and often require a second coat to achieve full opacity. Layering in thin coats gives the colors a more vibrant, rich look.
- Tip: Allow each coat to dry fully before applying the next one to prevent the colors from mixing or streaking. Patience is key when working with light shades like yellow or pastel colors.
9. Use Metallic and Neutral Colors for Details
- Why it works: Adding metallics (gold, silver) or high-contrast colors (white and black) for detailing gives your mandala a touch of elegance and can make a striking design. These colors will catch the light beautifully and elevate the overall look.
- Tip: Use metallic pens or markers for fine details like outlines, dots, and accents. For extra impact, consider using gold or silver on dark or deep-colored sections of the parasol to create contrast.
Create Your Own Mandala Parasol
Note that I’m an Amazon affiliate so when you click through and purchase, I get a commission. It doesn’t affect the price of your purchase. I only link to products that I’ve used and recommend. I use my Amazon Gift Cards to purchase art supplies. Thank you for your support!

Alcohol markers work really well. I used Sharpies of various brush tip sizes including wide tips for larger areas, medium tips for mid sized shapes, and fine tips for adding detail.
For a sophisticated look, work in black and white. Adding touches of gold and silver add lovely details especially on top of black areas. Posca paint pens are one of my favorites. I suggest using a Sharpie for the black areas and Posca paint pens for those finishing touches.
Choose your favorite color palette.
Be sure that whatever medium you use, that you have enough to finish this project. The parasol is a large surface to cover.
Have fun creating your own mandala parasol and be sure to share your final design with me!


Leave a Reply